Securing Your Router: The Danger of Default Credentials
Why Default Credentials Are a Huge Risk
When you plug in a new router, it often comes with a predefined admin username and password—commonly something like “admin” / “admin” or “admin” / “password.” These default credentials are publicly documented and widely known, which makes them a massive security risk.
- Cybercriminals often scan networks for routers still using default login information.
- If compromised, attackers can change your settings, monitor your traffic, or even redirect you to malicious websites.
- Leaving defaults in place is essentially leaving your digital front door unlocked.
Bottom line: If you haven’t updated your router’s login credentials, you’re vulnerable.
How to Update Your Admin Username and Password
Changing your router’s login details is one of the simplest—and most effective—ways to secure your home network.
Follow these general steps:
- Log in to your router’s admin dashboard (more on that below).
- Navigate to the section labeled something like Administration, System Settings, or Security.
- Look for the field to change Admin username and Admin password.
- Use a strong, unique password that you don’t use elsewhere.
- Save your changes and reboot the router if needed.
Tip: Store your updated credentials in a secure password manager.
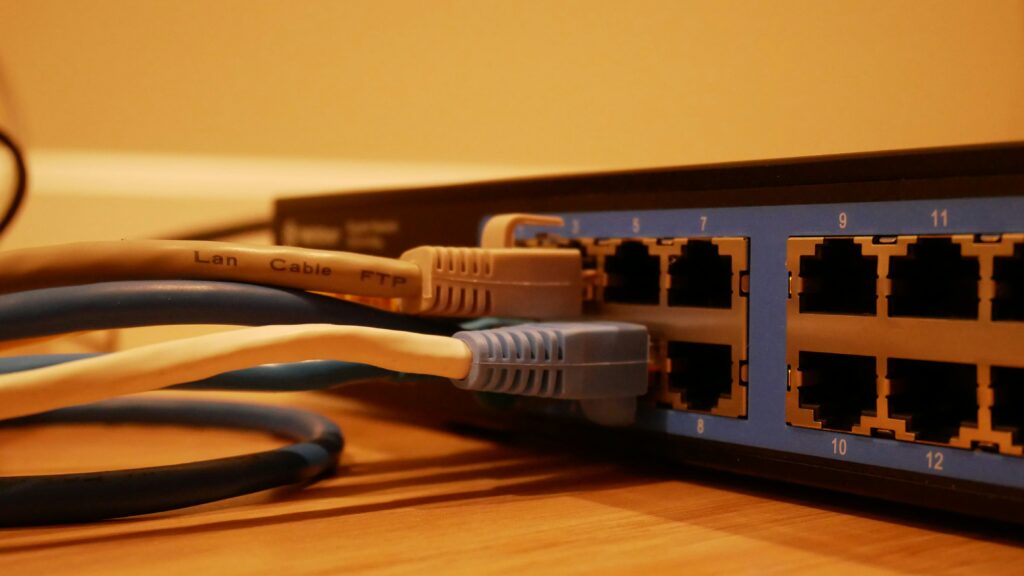
Where to Find Your Router’s IP Address and Dashboard
To make any security changes, you first need access to the router’s admin dashboard. This starts with finding its local IP address.
Option 1: On Windows
- Press
Windows + Rto open the Run dialog - Type
cmdand press Enter - In the Command Prompt, type
ipconfigand press Enter - Look for Default Gateway—this is your router’s IP address (usually something like
192.168.0.1or192.168.1.1)
Option 2: On macOS
- Go to System Settings > Network
- Click on your Wi-Fi network, then Details
- Look for Router—this is your IP address
Once you have the IP address:
- Open a browser window
- Type the IP address into the address bar (e.g.,
http://192.168.1.1) - You’ll be prompted to log in
If you haven’t changed the default login, check the sticker on the bottom of your router or search online for your router model’s default credentials.
Important: After logging in for the first time, update those credentials immediately.
Wi-Fi Security: WEP vs. WPA, WPA2, and WPA3
When it comes to Wi-Fi security, not all encryption methods are created equal. If you want to keep your network safe from intrusions, it’s essential to understand the differences between these security protocols—and to know which one is recommended for use in 2024.
What Are WEP, WPA, WPA2, and WPA3?
Each of these acronyms represents different generations of Wi-Fi security. Here’s how they stack up:
-
WEP (Wired Equivalent Privacy)
-
Introduced in the late 1990s
-
Weak encryption, easily cracked
-
Considered obsolete and insecure today
-
Should never be used
-
WPA (Wi-Fi Protected Access)
-
A temporary improvement over WEP
-
Uses TKIP (Temporal Key Integrity Protocol), which is now outdated
-
Slightly better than WEP, but still vulnerable
-
WPA2
-
Introduced in 2004 with AES encryption
-
A significant improvement in security and still widely used
-
More secure than WPA and WEP
-
Recommended if WPA3 isn’t available
-
WPA3
-
The newest and most secure protocol (launched in 2018)
-
Offers better protection against brute-force attacks
-
Adds forward secrecy (even if a password is compromised, past data remains protected)
-
Ideal for personal and enterprise networks
Which Security Option Should You Use?
- Use WPA3 if available. It provides the best protection and is becoming standard on newer devices.
- If WPA3 isn’t supported by your router or devices, use WPA2. Ensure it’s configured with AES encryption.
- Avoid WEP and WPA altogether. They are outdated and expose your network to serious vulnerabilities.
How to Enable WPA3 or WPA2
Securing your Wi-Fi isn’t difficult if you know where to look. Here’s how to upgrade:
-
Access your router’s admin settings
Typing 192.168.1.1 or 192.168.0.1 into your browser typically brings up your router’s login page. -
Login and find the Wireless or Security settings
-
Set your security mode to WPA3 or WPA2 with AES encryption
- If WPA3 isn’t listed, check if a firmware update is available for your router.
- Save changes and reboot your router if needed
Why Open Networks Are a Bad Idea
Open Wi-Fi networks (those without a password) may seem convenient—but they’re also dangerous.
Here’s why:
-
No encryption means anyone nearby can intercept your data
Sensitive information like passwords, personal files, and messages can be easily captured. -
You could be targeted with man-in-the-middle attacks
Hackers can intercept or alter your communication without your knowledge. -
Your network can be hijacked for illicit activity
Others might use your bandwidth or even conduct illegal activity using your IP address.
Bottom line: Always secure your Wi-Fi with WPA3 or WPA2. Never rely on open or outdated protocols.
Keeping your network protected is step one in staying safe online.
If your network’s open, you’re basically hanging a ‘welcome’ sign for hackers. Whether you’re an independent creator or part of a small content team, a vulnerable connection can wreck everything—from your video files and edit timelines to private data and financial accounts. One bad breach and you’re locked out of your own content, spending days cleaning up a mess instead of uploading.
The most common threats? Malware that slows or spies on your system. Unauthorized users leeching bandwidth or planting backdoors. Phishing attacks that target logins tied to monetization or subscriber data. These hits aren’t hypothetical—they happen quietly and often.
Thing is, locking things down doesn’t have to be complicated. Strong passwords, updated software, and smart use of VPNs or network firewalls make a big difference. The goal isn’t paranoia—it’s making life hard for the bad guys without slowing you down. A hardened network keeps your creative pipeline moving, and your audience never misses a post.
Change Your Wi-Fi Name—Seriously
If your network name still looks like “Linksys123” or “NETGEAR-default,” you’re broadcasting a red flag. Default SSIDs (Service Set Identifiers) scream, “I haven’t touched my router since I plugged it in,” and that’s exactly what hackers hope for. The first step to tightening your digital space is basic: rename your Wi-Fi.
But don’t get cute with it. Avoid home addresses, full names, or anything that clues people in to who you are. “SmithFamilyWiFi” or “123MainStNetwork” might feel personalized, but they also make you easier to profile or target.
Go for neutral, untraceable names: “voidnet,” “coffeecloud,” or heck, just random letters and numbers like “ZXT1029.” The idea is anonymity, not entertainment. Keep it clean, keep it boring—and your network stays just a bit more secure.
Disable Unused Features to Reduce Risk
Modern routers come packed with features designed for convenience—but not all of them are worth the risk. Settings like UPnP (Universal Plug and Play), remote access, and WPS (Wi-Fi Protected Setup) may simplify tasks, yet they often open doors to potential vulnerabilities.
What to Watch Out For
These features are commonly enabled by default, but most home users don’t need them:
- UPnP (Universal Plug and Play): Automatically opens ports for connected devices, which can be exploited from other devices or malware inside your network.
- Remote Access: Allows you to control your router from outside your network. This is convenient, but it can be a target for hackers.
- WPS (Wi-Fi Protected Setup): Designed to make it easy to connect devices—but PIN-based WPS is notoriously insecure.
Why You Should Disable Unnecessary Features
Every enabled feature adds to your router’s “attack surface”—the number of ways a threat actor could gain access. By turning off what you don’t use, you make your network smaller, safer, and harder to penetrate.
Security Rule of Thumb: If you don’t need it, turn it off.
How to Find and Disable These Settings
Locating these features is easier than you think:
- Log in to your router’s admin panel – usually by typing
192.168.0.1or192.168.1.1into your browser’s address bar, or by using an app provided by your router’s manufacturer. - Navigate to the ‘Advanced Settings’ or ‘Security’ tab.
- Look for settings relating to:
- UPnP
- Remote Management/Access
- WPS
- Toggle these options off if they’re not essential to your current setup.
Taking a few minutes to audit and disable unused features can significantly improve your home network’s security posture.
Keeping your main network safe starts with one simple move: create a separate guest network. Think of it like giving visitors the key to the porch, not the whole house. This separation keeps your devices, data, and workspaces off-limits if something shady connects to your Wi-Fi.
Setting up a guest network is easier than it sounds. Log into your router’s settings—usually by typing 192.168.1.1 or 192.168.0.1 into your browser. Look under ‘Wireless’ or ‘Guest Network’ settings (naming varies by brand). Turn it on, give it a name, and set a password that’s different from your main one.
Once it’s live, restrict what guests can do. For most routers, you’ll see options to deny access to shared folders, printers, or other devices on your network. Disable things like local network access or admin panel visibility. Keep it stripped-down: internet access only, nothing more.
This small move locks one more door between your digital life and the rest of the world. And in a time where one wrong click can cause a mess, it’s worth the five-minute setup.
Keep Your Software (and Router) Updated
Updates aren’t just about shiny new features—they’re often releasing patches to fix serious security holes. Hackers look for outdated systems because they know those weaknesses are easy inroads. So when your gear or software rolls out an update, take it seriously.
For routers, it’s not always obvious. Unlike your phone or laptop, most don’t ping you when there’s a new firmware patch. You’ll need to log in to your router’s control panel—usually through a browser using an IP like 192.168.1.1—and check manually. Some newer models offer automatic updates, but most don’t by default. Set a monthly reminder to check. It takes five minutes, and it beats the mess of dealing with a compromised network.
Same goes for your cameras, editing software, browser extensions—anything connected to your vlogging workflow. Make checking for updates part of your process. In 2024, staying current means staying secure.
Home Security Isn’t About Paranoia—It’s About Protection
Rethink the Word ‘Security’
When people hear “security,” they often think of extreme measures or complex tech setups. But the reality is much simpler: home security is less about fear and more about taking control. It’s about making sure your digital and physical spaces are safe from unnecessary risks.
- Protection begins with awareness, not alarm.
- Most threats can be minimized with basic, consistent habits.
- Your goal isn’t to lock the world out—it’s to protect what matters inside.
Simple Measures That Work
You don’t need an elaborate system to keep your data and devices secure. Often, it’s the small steps that have the biggest impact.
- Use strong, unique passwords for your devices and online accounts.
- Enable two-factor authentication where available.
- Keep your software and firmware up to date.
- Secure your Wi-Fi with a robust password and consider hiding your network name (SSID).
- Limit the number of smart devices you connect—and monitor how they’re used.
The Digital Side of Home Security
In a connected world, home security extends beyond doors and locks. Your data, habits, and activity patterns are part of your digital footprint.
- Be cautious about oversharing on social media (especially in real-time).
- Regularly check app permissions on your mobile devices.
- Back up your important files to a secure, offline location.
Take the First Step Toward Digital Self-Reliance
If you’re ready to build something secure from the ground up, consider starting with your OWN space online.
Want to build your own secure website next? Check out our Beginner’s Guide to Building a Personal Website Using HTML and CSS for your next project.
Digital security isn’t just for businesses and IT nerds anymore—it’s table stakes for content creators. Vloggers sit on terabytes of footage, personal data, and untapped IP. Keeping that safe starts with a few basic but powerful upgrades.
Start by switching to a secure DNS service like Cloudflare’s 1.1.1.1 or Google DNS. It’s a quiet improvement—faster connections, less tracking, and added protection from common online threats.
Next, hook up a VPN across your devices or set one up at the network level. Especially if you’re filming in coffee shops or uploading from airports, a VPN shields your traffic from snoops and unsecured public Wi-Fi.
Finally, separate your smart devices. A lot of vloggers have home studios with smart lighting, cameras, even AI assistants running in the background. If your router allows, isolate these on a separate VLAN. That way, if one device gets compromised, the rest of your digital workflow stays intact. Think of it as shutting a door before the fire spreads.
It’s not about paranoia—it’s about control. And in 2024, creators who don’t lock the door are asking for trouble.